
Gluing faux panels to the concrete, cinder block, masonry, or metal both inside and outside your home is a simple and affordable way to refresh a surface while adding value.
For example, faux wood paneling, like a beautiful reclaimed shiplap faux barn wood panel, turns your dark, gray basement into a comfortable living space that you’ll want to retreat to in the evening. And, Kentucky dry stack faux stone panels bring warmth and interest to your foundation and the concrete walls surrounding your pool or outdoor dining area further enhancing its curb appeal.
By installing the panels yourself, using basic tools and adhesive, you have the power to save more money and complete the job in just a few hours. And because all faux panel varieties are made from high-quality, durable polyurethane, they won’t crack, chip, or fade, and they look just like the real thing.
Keep reading to discover how to glue paneling to concrete, cinder block, masonry, and even metal, and start envisioning your project coming to life!
Before You Start Installing Faux Panels
For a safe and successful project, you want to ensure your concrete surface is structurally sound. Conduct a visual inspection for large cracks and any leaks (damp concrete is a warning sign). Small cracks and holes should be filled to prevent pests from entering. In the case of a leak, your paneling will not adhere properly and you may experience mold growth behind the panel. Any leaks must be professionally repaired before installing faux panels.
Pro Tip: Lay your panels out flat in the installation area for at least 24 hours prior to installation. This will help your panels acclimate to the area.
Gather Tools and Materials
Before you begin gluing your wood, stone, or brick paneling to the concrete, metal, masonry, or cinder block surface, gather the following tools and materials.
- Caulk gun
- Chalk line/laser
- Clean cloth
- Color-coordinating textured caulk
- Cotton swabs
- Disposable gloves
- Great Stuff Applicator Gun
- Great Stuff Pro Gun Cleaner
- Great Stuff Pro Construction Adhesive
- Level
- Loctite PL 3X Premium Construction Adhesive (one tube per every three panels is best)
- Panels
- Pencil
- Safety glasses (recommended to wear throughout the entire process)
- Small paint brush
- T-square
- Tack cloth
- Tape measure
- Touchup kit
- Water
- Wire brush
- Wood cutting saw with finish blade
Don't have your panels yet? Take a look at our wide variety of natural-looking faux panels and wood beams.
View our Faux Panels & Siding View Our Wood Beams
Determine Your Installation Workflow
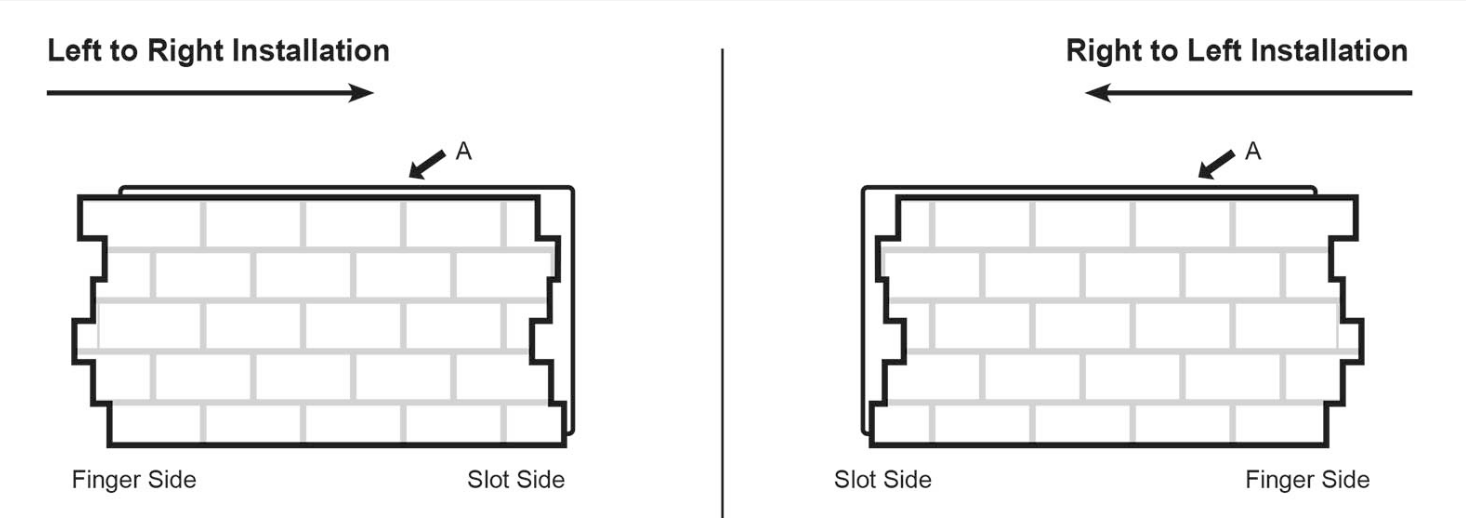
Installation will run either left to right or right to left. Your workflow will depend on the type of panels you have. The photo below will help you determine which direction you must install.
Lie your panels flat with the “A” lip away from you. If the fingers stick out to the left, you will install your panels left to right. If the fingers protrude to the right, you will install your panels from right to left.
How To Install Paneling on Concrete Walls
Faux wood, stone, river rock, and brick panels can be glued directly over concrete on the interior or exterior of your home. And because faux panels are lighter and easier to handle than real wood or stone, installation is a simple DIY project.
Below is an overview of how to adhere faux panels to concrete. These easy instructions work for gluing paneling to concrete, masonry, cinder block, and metal. When you are ready to complete your project, you can find more detailed instructions on how to properly install panels on concrete.
Helpful Hints:
- Because they’re a little different, for fieldstone and chevron, be sure to consult with the style-specific installation instructions.
- If your panel style allows it, and most styles do, it's highly recommended to offset your seams to achieve the most realistic look.
- If you are gluing paneling to the concrete foundation blocks on the exterior of your home, you need a landscape “buffer” in between the foundation and the lawn where you may be using a trimmer. This will avoid possible damage to the panels from the string trimmer.
- During installation, try using panels that you have already trimmed to start or end a row, instead of trimming a new one to save even more money and material.
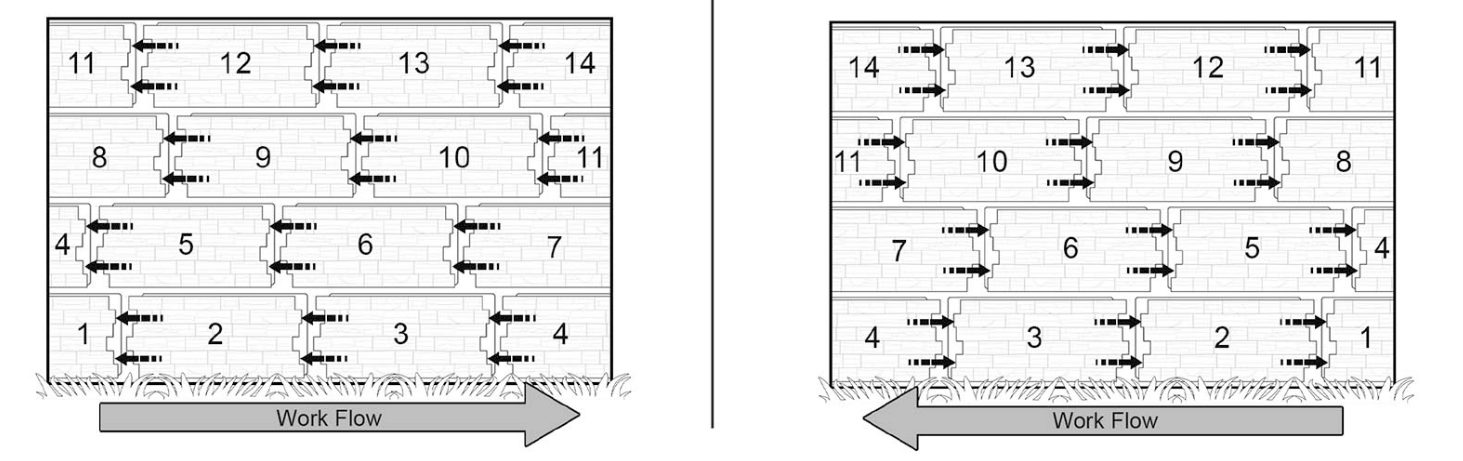
Step 1: Orient Panels & Determine Installation Order
Using the instructions described above, orient your panels so that the lip “A” is up. And based on which side the fingers protrude, you’ll install your panels either left to right or right to left.
Each panel is expertly hand painted and will contain some color variation throughout. Therefore, it's important to first lay your panels out on the floor near your work surface, in the order you wish to install them. This way, you can be sure that you aren’t creating clusters of the same colors or patterning. Variation is the key to a natural-looking installation!
Step 2: Prepare Your Concrete Surface
Your installation surface must be structurally sound and in good condition prior to panel installation. Double-check the surface for any large cracks or holes. All holes and cracks must be filled with caulk before installation to protect against pests. If your wall has any leaks, they must be fixed before installation to avoid mold growth and further issues.
Next, it's important to wipe your surface clean of any debris or loose/chipping paint, to ensure a tight bond between the concrete surface and your panel. Concrete, cinder block, and masonry will likely require a wire brush to remove loose debris since the surface is hard and textured. It's also recommended to wipe down the backs of your panels to remove any dust or debris. Now your surfaces are clean enough for the adhesive to stick properly.
Step 3: Trim Your First Panel (if needed)
At this point, your concrete wall is ready to be covered! If you are installing interlocking corners, you can skip this step. There is no need to trim.
To trim your first panel; turn the panel over on a soft surface and make a mark when you plan to make the cut. Using a wood-cutting saw with a finish blade, trim the panel. It's recommended to trim at least ¼ of your first panel off to reduce waste.
Step 4: Draw a Level Line
Create a level line that runs the length of the wall to indicate the top of the first row of panels. This will keep your project moving along in a straight line.
Step 5: Install Corner Piece (optional)
If you are installing any corner pieces, the first corner must be installed before starting the first row of panel installation. To install the first corner, follow steps 6-8.
Step 6: Apply Adhesive
Now you’re ready to adhere your wood, stone, or brick panels to the concrete.
Using construction-grade adhesive, apply lines of glue about 6 inches apart in vertical, parallel lines across the panel and then add a dab of adhesive to each panel finger. No screws necessary!
Step 7: Adhere Panel to the Concrete
With glue applied to your panel, adhere it to the concrete. It helps to use a bit of a twisting motion and a good amount of pressure to create a secure bond. Be sure that the top of your panel matches up with your level line.
Step 8: Apply Adhesive and Caulk
Apply a bead of adhesive to the slot side of the panel. Then apply textured caulk where the face meets the panel for a watertight finish.
Step 9: Repeat Steps 6-8
With your first panel in place, repeat these steps for each one after. Keep an eye on your level line, so your rows stay straight. Ensure each piece is placed tightly against the others.
Helpful Hint: Before cutting or trimming a full-sized panel to fit at the end of a row, take a look at what you’ve already cut. You may be able to use a previously cut panel to minimize waste. Another great way to save money on materials!
Step 10: Start the Next Row
Note: If you are using chevron, anson fieldstone, or river rock to cover your concrete, cinder block, masonry, or metal surface, please consult our detailed river rock panel installation instructions and chevron wood panel installation overview.
For all other panel varieties; start your next row directly above the last one while making sure to offset the panels for a more natural layout. Carlton and Herringbone Brick panels will not be offset.
Before installing the next row, apply adhesive to the top lip of the panel below. Take your time when adhering to the next panel to ensure a tight fit. Continue this process until you are finished covering the existing surface.
Step 11: Touch-Up As Needed
This is where you can apply textured caulk to fill in any gaps, holes, or joints. Use a touch-up kit to blend the caulk and cover any blemishes for a beautiful, realistic finish.
Your touch-up kit will likely contain a base coat, tint, and wash which should be applied in that order. If your touch-up kit includes a base coat, apply it first by using a cotton swab to apply a light layer. Allow this coat to dry. Next, apply the tint using a small paintbrush. Finally, if you have a wash, apply the wash using a paintbrush and a soft cloth to blend it.
And just like that, you’ve covered your boring, gray concrete with timeless faux wood, brick, or stone that looks just like the real, natural thing. And you saved money along the way!
Add Finishing Touches to Your Project
If you plan to cover your concrete basement walls with paneling, consider using real or faux wood box beams on your ceiling as a final touch on your DIY makeover. Just like faux paneling, wood beams and faux wood beams are more lightweight than solid wood beams and easier to install yourself. You’ll be glad to know that there is no need to hire a contractor to complete the project!
Installing Faux Panels to Concrete Makes for an Easy, Stunning Home Transformation
You don’t have to live with the unsightly concrete in your basement or the drab cinder block on your home’s foundation. Installing faux panels to your concrete, cinder block, masonry, or metal surfaces provides an instant upgrade that is both beautiful and affordable.
Faux panels are cast from molds that are made from real wood, stone, and brick, giving them the same look and texture as the real thing. And because they’re made from durable polyurethane; they are resistant to damage from water, harsh sunlight, and pests; making them ideal for indoor and outdoor use. Faux panels are so lightweight, you can even install them yourself in just a few hours.
Are you ready to cover your concrete and add charming appeal in the process? Discover our wide variety of natural-looking faux panels and wood beams below.
Faux Panels & Faux SidingWood Beams
Shop Related Products


