Chevron Wood Installation Instructions
General Tools and Materials:
-
 Caulk Gun
-
 Chalk Line / Laser
-
 Clean Cloth
-
 Color Coordinating Textured Caulk
-
 Cotton Swabs
-
 Level / Laser / Plumb Bob
-
 Panels
-
 Wood Cutting Saw with Finish Blade
-
 Speed Square
-
 Safety Glasses
-
 Small Paint Brush
-
 T-square
-
 Tack Cloth
-
 Tape Measure
-
 Touchup KIt
-
 Water
Water
-
 Pencil
-
 1 5/8” Drywall Screws
-
 Screw Gun / Drill Driver & Driver Bits
-
 Loctite® PL®
Premium® 3X
Construction
Adhesive
Loctite® PL®
Premium® 3X
Construction
Adhesive
-
 Drainage
Mat
Drainage
Mat
24 Hours Before Starting
Acclimate all panels by storing them flat in the installation location (but away from moisture and direct sunlight or other heat sources) for at least 24 hours.
WARNING:
- Be sure to obey all safety rules and recommendations set forth by tool manufacturers.
- Wear safety glasses during the entire installation process.
- Be sure to follow all applicable building codes.
- Always comply with clearances set forth by the manufacturer of stoves, fireplaces, furnaces, and any other heat source.
Chevron Wood Installation Instructions
Before You Start
- Walls must be structurally sound and in good condition. Evaluate the wall and floor make a plan to address any warping and bowing.
- Gather all tools and materials.
- For exterior Installation, install exterior sheathing and house wrap.
- If you will be working around corners, determine the best approach for your project using our installing faux panels around corners instruction sheet.
Installation will run floor to ceiling then left to right.
Click Here for Care and Maintenance info.
Directions

Step 1
Install Drainage Mat (exterior only)
Tools:
- Drainage Mat
- Deck Screws
- Screw Gun/Drill Driver with Driver Bits
- Orient the roll so that the grid side faces the wall and the smoother side faces out.
- Fasten the drainage mat to the wall using deck screws long enough to pass through the mat, house wrap and into the structural material.
- Please comply with all regional building codes. Drainage mats are required for all exterior installations except those over concrete/masonry/metal.
- The DM-3611R Drainage Mat meets Canadian Building Codes and is required for most exterior installations in Canada.
- Exterior sheathing and house wrap must be installed before the drainage mat.
Step 2
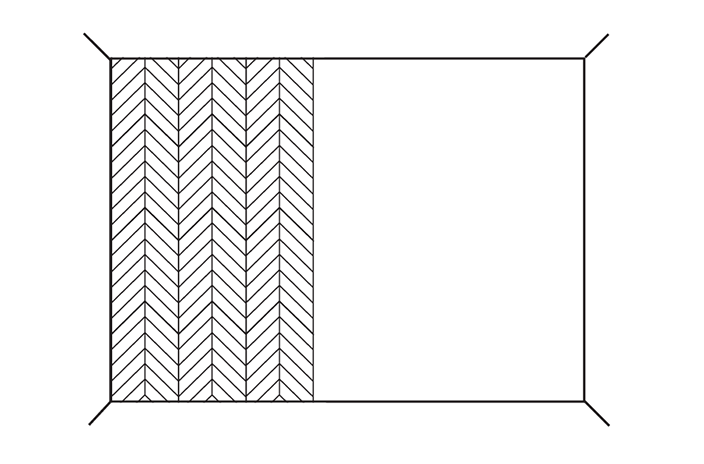
Plan Your Installation
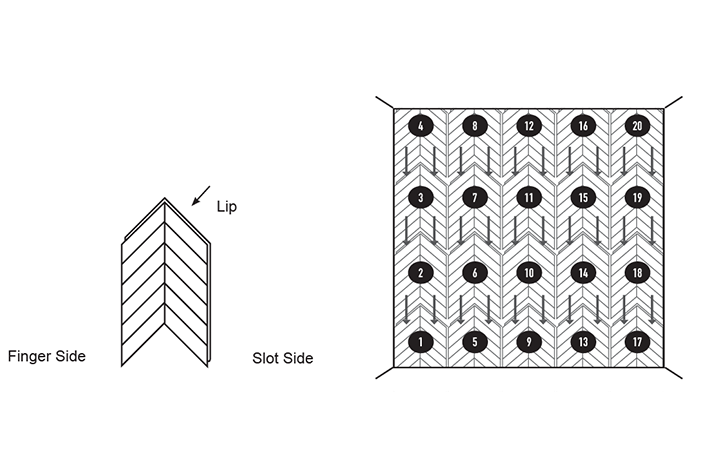
Measure the width of your wall and determine if you want the rise or fall of the chevron pattern to land on the center of the wall. Depending on the width of your wall, you may need to use partial panels at the beginning and end of your run.
To determine the width of the partial panel, take the width of the wall and divide it by the width of the panel (24"). Divide the remainder in half to determine the width of the partial panels.
Example: width of wall is 84". 84"/ 24" = 3.5 You will need three (3) full panels and two (2) 1/4 width panels (.5/2) to span the installation and center the installation on the wall.
Step 3
Prepare Surfaces
Tools:
- Clean Cloth
- Tack Cloth
Wipe walls with a tack cloth to remove any dirt or sawdust. Clean surfaces are required to ensure the panels adhere properly.
Step 4
Install Bottom and Left Trim Pieces (optional)
Tools:
- Speed Square
- Trim
- Dry Wall Screws
- Screw Gun/ Drill Driver with Driver Bits
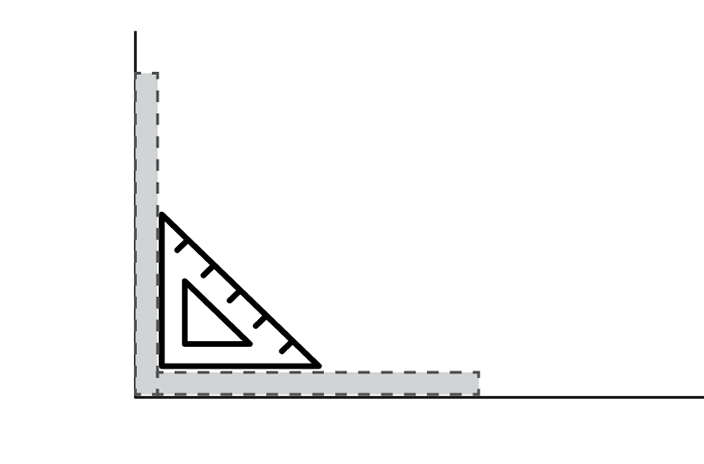
- Install bottom and left side trim pieces by toescrewing them to the wall with a screw every 12-18 inches. Screws do not need to hit a stud.
- It is essential that trim pieces meet at a perfect 90 degree angle to ensure panels align properly.
Step 5
Trim Bottom Panels
Tools:
- Wood Cutting Saw with Finish Blade
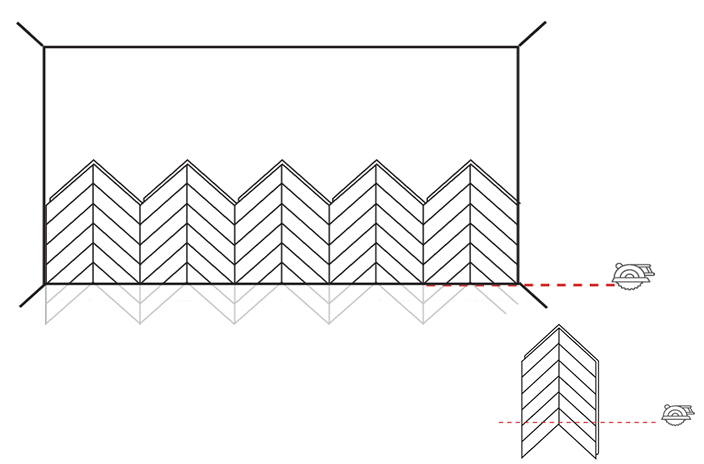
- Determine the number of panels needed to span the width of the installation.
- Trim the tail portion off the bottom panels. Take extreme caution to trim panels at an identical height. This is CRITICAL to the seams lining up during installation.
- Set aside all but one(1) of the cut panels.
Note: Retain the cut portions of the panel as they may be useful when it comes to completing a column.

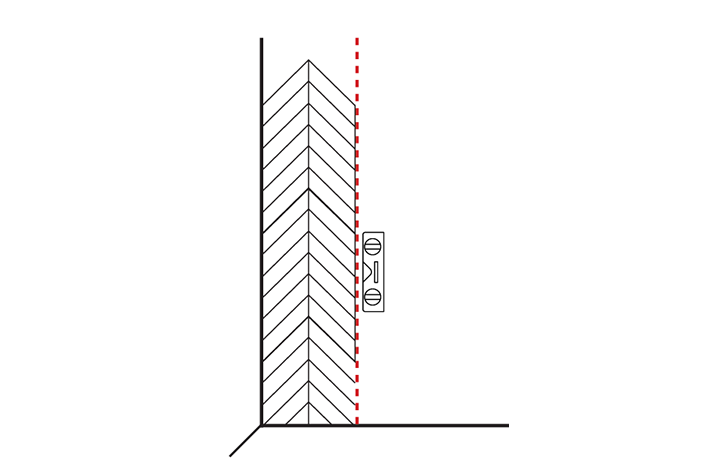
Step 6
Attach Panel to Wall
Tools:
- Screw Gun / Drill Driver & Bits
- Drywall Screws
- Level / Laser / Plumb Bob
Screw the panel to the wall by adding screws along the lip of the panel. Slightly countersink the screws.
Step 7
Finish First Column
Tools:
- Wood Cutting Saw with Finish Blade
- Tape Measure
- Clean Cloth
- Caulk Gun
- Color Coordinating Textured Caulk
- Level / Laser / Plumb Bob
- Repeat Step 6.
- If the portion that was trimmed in Step 5 completes the height of your installation then use it here. If not, then trim the top-most panel to fit the desired installation height. Be sure to leave room for trim boards, if applicable.
- Install the top panel following the same process as the full sized panels.
Step 8
Trim and Install Remaining Panels and Add Optional Trim Boards
Install the remaining panels following Step 6 to Step 7 above.
IMPORTANT - Take extreme care to ensure that the planks line up during this step.
Step 9
Touch-Up As Needed
Tools:
- Water
- Cotton Swabs
- Touch-up Kit
- Paint Brush
- Spackle / Wood Putty
- Clean Cloth
- Fill holes using spackle/wood putty. IMPORTANT: Do not overfill the holes or attempt to sand the spackle/wood putty. Sanding will ruin the surface.
- If your touch-up kit contains a base coat, use a cotton swab to apply a light layer of the base coat and allow it to dry completely (about 30 minutes).
- Using a paint brush, apply the appropriate paint then dab with a soft cloth to blend and allow to dry completely (about 30 minutes).
- If your touch-up kit contains a wash, apply the wash using a paint brush and dab with a soft cloth to blend. If the bottle is labeled “wash concentrate” add tap water to the neck of the bottle, screw the lid back on and shake to mix before using.
- If you need to mix colors to achieve the desired shade, we recommend doing so on a piece of scrap material.
- Paint can be thinned by adding water.
- Start wth lighter colors.