Whether you want to add a single brick accent wall or create a new rustic retreat, faux panels are an attractive, versatile, cost-effective way to overhaul your interior and exterior designs. And one of the best things about using Barron Designs’ polyurethane faux panels is that they are so lightweight and easy to handle that even a novice do-it-yourselfer can quickly and easily complete a room renovation.
Unlike real wood and stone, which require specific tools and skills to install, faux paneling can easily be installed using common tools found in almost every DIYer’s toolbox, including glue, nails, and screws. While most projects will go off without a hitch, certain spots can cause headaches, particularly for new DIYers. Perhaps one of the greatest challenges you’ll encounter while installing faux panels is making the proper cut around electrical wall outlets.
Most walls have at least one outlet. In each instance, the hole for the outlet must be cut perfectly to ensure that the panel fits correctly. Having just one incorrect measurement can make for a bad day, so we want to make sure that you get the right fit, and the right cut, every time. There are different ways to approach this task. Below, you’ll find two methods that we’ve found to be consistently effective.
Cutting Paneling for Outlets
Method 1: Marking Your Panel
This is a simple way to make sure you precisely cut the panel in the right place. To begin, select the panel or panels that are going to be installed. Lay them out, face down, and determine exactly where they will be placed on the wall.
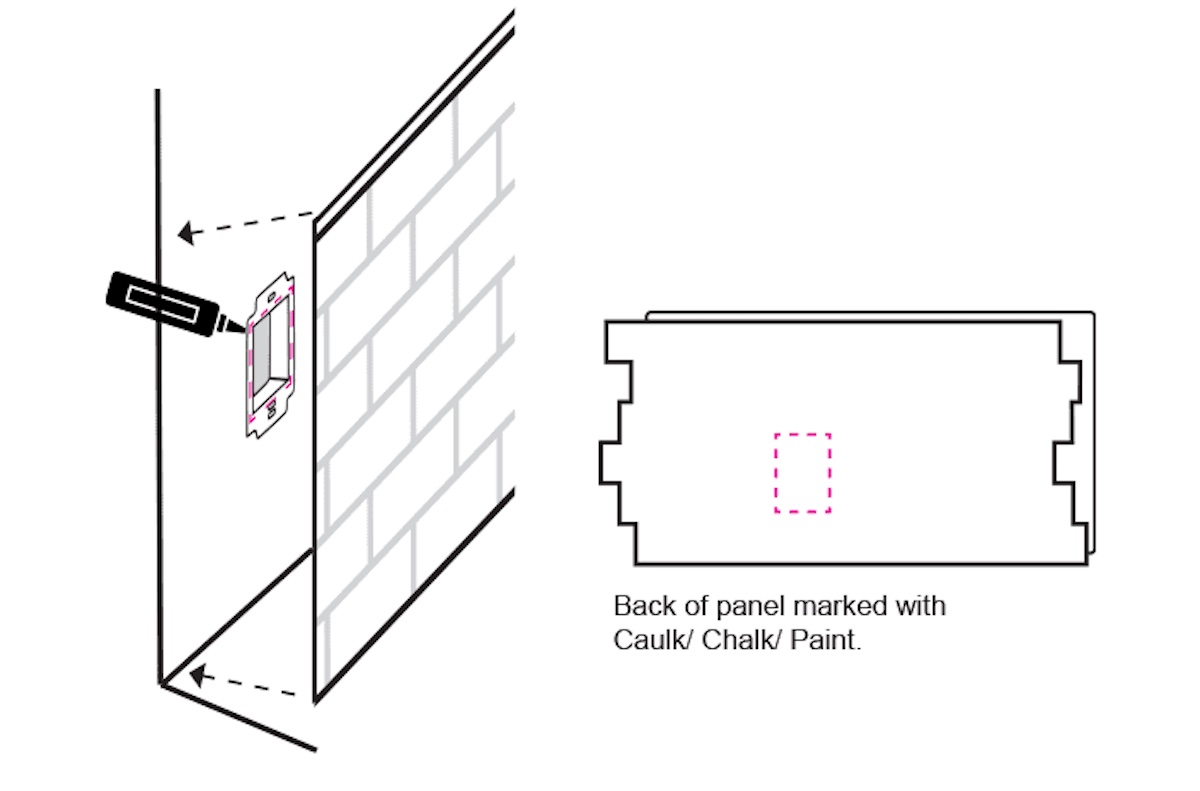
Install all the panels leading up to the outlet. Mark the outlet with paint, chalk, or caulk. Press a new panel against the wall to transfer the mark. If it’s not entirely clear, press the panel against the wall again to make sure you have the full outline.
Once you have the outline of the outlet, use painter's tape to mark it so you’ll have a reliable line to follow as you cut. Finally, make the cut as marked and install the panel.
While this can be faster and easier than the second method we’re about to discuss, you need to make sure you don’t shift or move the panel while you’re getting the outline, or you could end up with an incorrectly placed imprint.
Method 2: Measuring Your Panels
Measuring the wall is a reliable way to get the proper dimensions, but it’s critical to make sure your measurements are exact. Use a measuring tape to find the distance from the floor to the bottom of the outlet and mark that on the back of the panel with a pen or permanent marker.
If other panels will surround the panel with the outlet, install them first to make your measurements easier and more accurate. If no other panels are being used in the space, measure the distance from the wall to the edge of the outlet on each side. And since panels should be installed from the bottom up, make sure you’re making your panel-to-panel measurements with this fact in mind.
Finally, measure the outlet and, using the distances you have already marked on the panel, draw the square or rectangle on the back of the panel. Before cutting, check the measurements to confirm that all of your calculations are correct.
Correctly Cutting Your Panel
Now that you know where you need to make the hole for the outlet, it’s time to start cutting. Before you do, measure everything one more time just to be sure.
Make the Cut
Follow the proper cutting steps to safely and correctly remove a section of your panel and make room for the outlet. First, use a drill to make a pilot hole inside the outline that you marked earlier, then insert the jigsaw blade into the pilot hole and cut along the exact outline you’ve marked on the panel. A pro tip for this step is to cut slightly inside the lines. You can always remove more material with sandpaper or a saw for a perfect fit (but you can’t add it back).
If you want to better define the cutting path of the saw, use a utility knife to create a guide line that follows the line you created with the marker or painter’s tape. Then, follow the same process: Use a drill to make the initial hole and use a jigsaw to follow the path you’ve made with the utility knife.
Once you’ve cut the hole, the cut-out area will snap out easily. Before using any type of adhesive, place the panel against the wall to ensure that you have a perfect fit around your outlet.
Using Outlet Surrounds
If you want to create a cleaner finish for your panel opening, consider installing electrical outlet surrounds. They cover the cut edges of the panels so that the raw foam isn’t visible. Barron Designs offers two surrounds for this purpose.
The universal faux stone electrical outlet surround is designed to be used with stone panels. It makes the outlet sit flush with the panel for a cleaner look. For brick panels, choose the slim electrical outlet surround, which will stay flush with the drywall behind the panels.
To install the outlet surrounds, you will follow the same steps for marking the hole. From there lay the surround on the panel so that it frames the markings. Trace the outline of the surround then make the cuts to remove the indicated area.
Get Expert Support For Your Panel Installation
If this is your first time taking on a faux wall panel project, you might have questions. Be sure to read our Panel Installation Instructions thoroughly before starting your project, and if you have other questions, reach out to our design consulting team via live chat or at 800-651-4223. We’ll be happy to talk you through it!
If you still need to find the right panels for your project, be sure to check out our wide variety of faux panels.
Shop Related Products


