Wood Paneling Installation
Printable PDF of Tongue and Groove Wood Planks Installation Instructions
Tongue and groove wood paneling from Barron Designs can be installed in a variety of ways. Installers are encouraged to research installation methods and determine the one most appropriate for the project.
Tools and materials
- 15- or 16-Gauge Brad Nailer + Brads long enough to penetrate the tongue and groove planks plus any sheathing material and into studs/furring strips/joists
- Circular/Chop Saw (for cutting/ripping planks)
- Jig Saw (to create openings such as for electrical boxes)
- Stud Finder
- Pencil
- Level/Laser
- Rubber Mallet
- Ladder(s)
- 1x2 Furring Strips (installation dependent)
- Loctite PL 3x Construction Adhesive (installation dependent)
- Safety Glasses
- Carpenter Square
Before Starting Your Installation
- Acclimate all materials in the installation location for at least 1 week before installation.
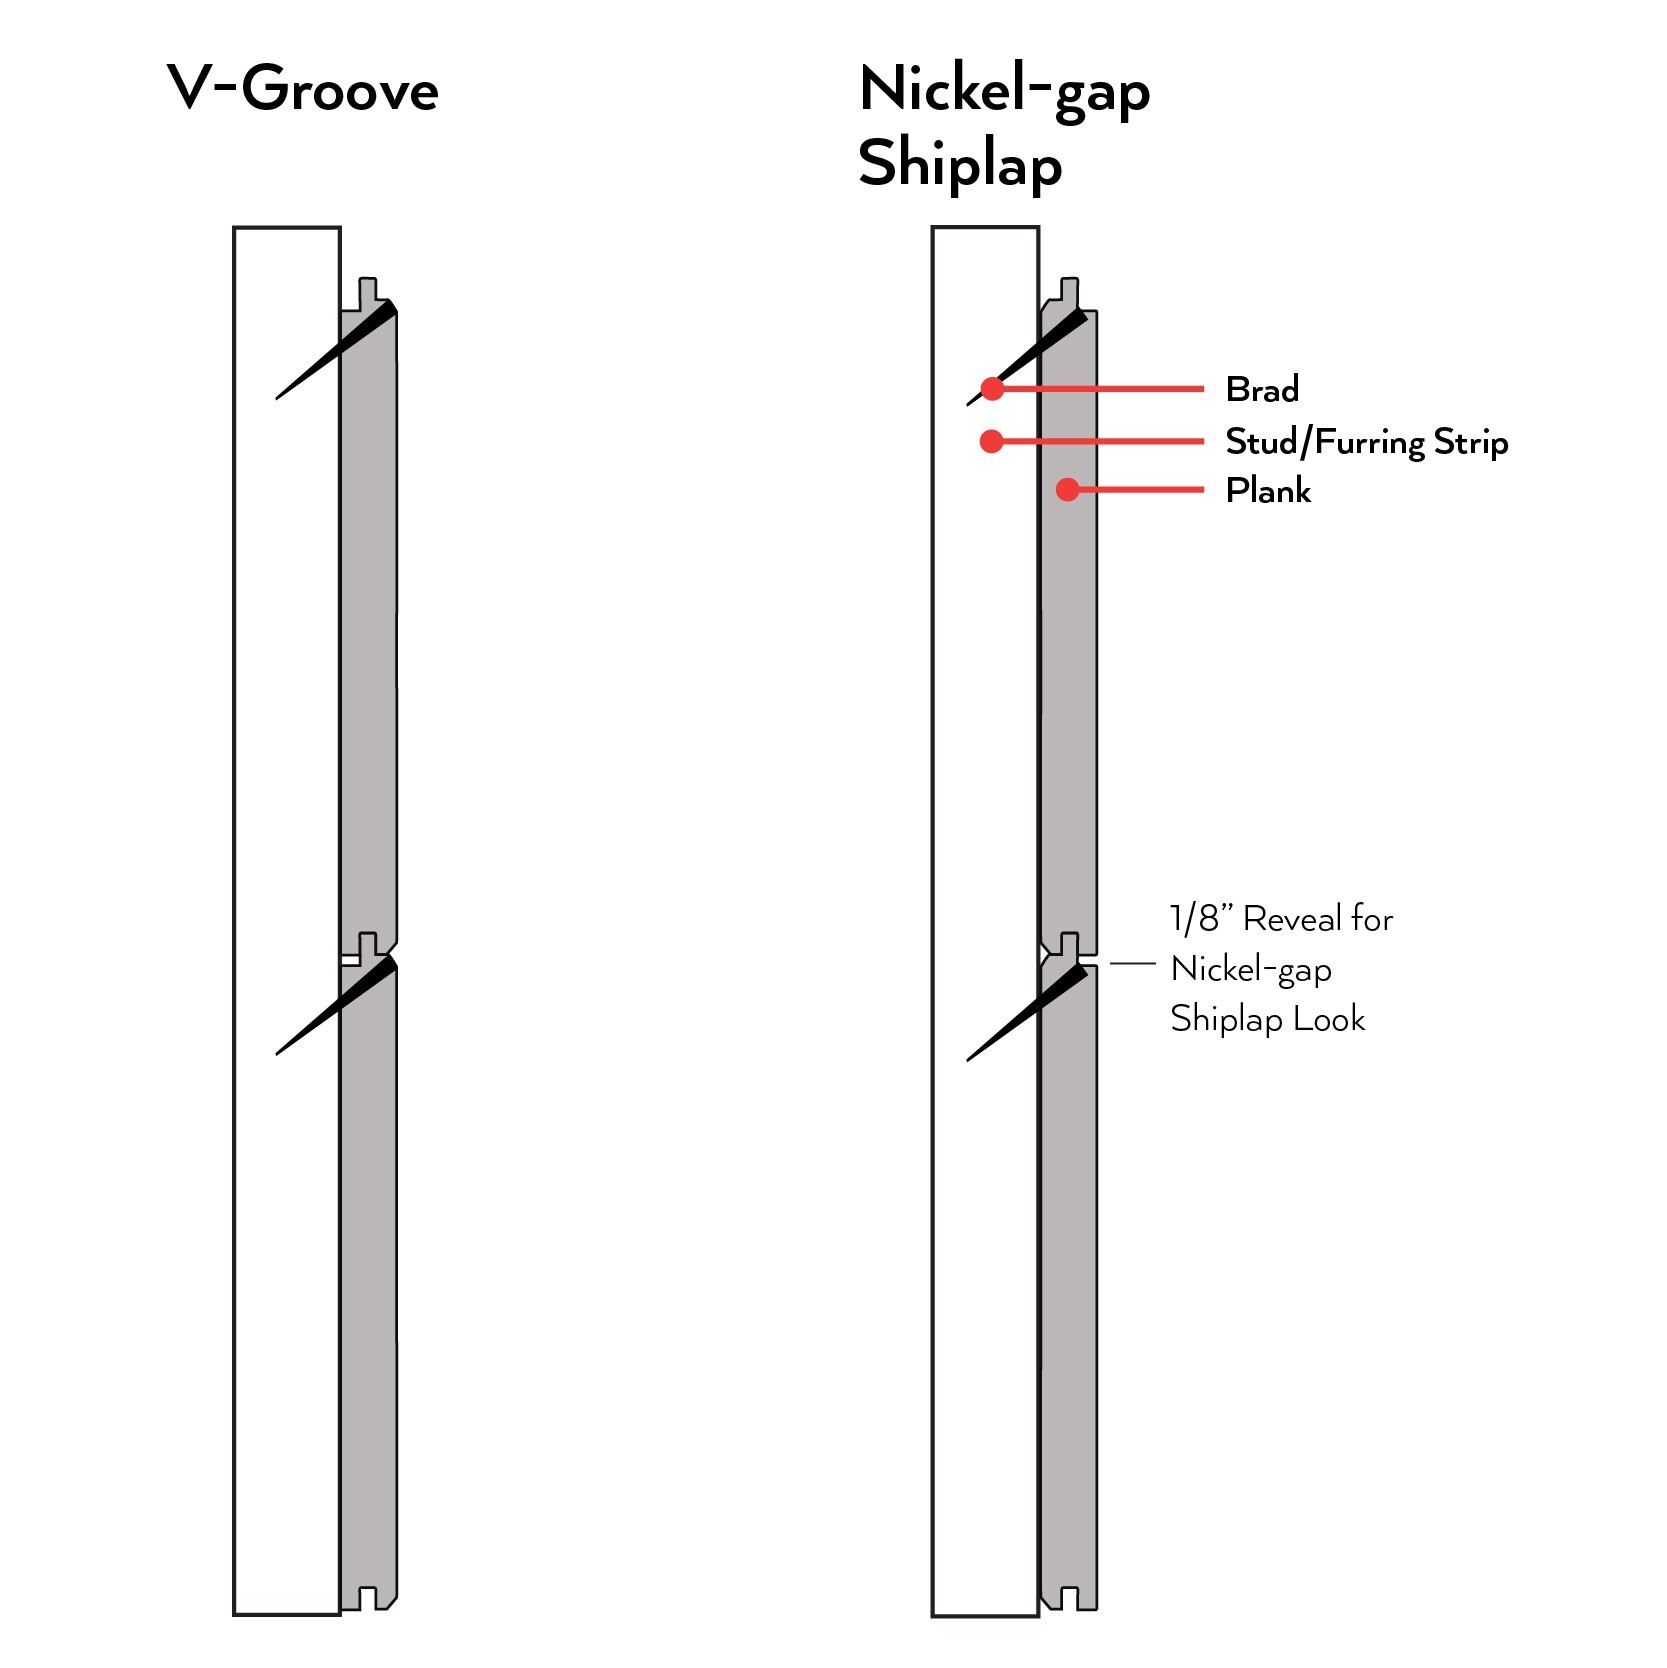
- Determine if the wall/ceiling will feature the nickel-gap shiplap or v-groove.
- Inspect wood planks and orient so the selected face (nickel-gap or v-groove) is out.
- Look at the grain and knots in the planks and plan the installation order.
- If there are areas of a plank that you do not like, cut that section out of the plank and use the remaining material.
- Have a trained professional pull all electrical and duct work and establish the location of light fixtures, HVAC, outlets etc.
- Ensure the pressure of the brad nailer is appropriate for the installation substrate(s).
Wall Installation Instructions – Horizontal
- Remove/account for any obstructions – including baseboard, crown moulding and outlets.
- Mark the studs, if they are not visible
- Start at the bottom and work up
- If blind-nailing the planks start with the tongue edge facing up. Place the plank against the wall. Ensure the plank is level. Drive brads through the shoulder of the tongue and into studs at a 45-degree angle along the length of the plank.
- If face-nailing the planks, either edge can face up, however if you have the groove facing up you will likely need to remove the tongue from the first board. Place the plank against the wall. Ensure the plank is level. Drive brads into the into studs along the length of the plank.
- Continue the length of the first row of planks by butting the planks together.
- As you progress up the wall, stagger the butt joints between planks. You will likely need to cut full length planks to stagger the joints.
- Start the next row by selecting a partial plank. Securely seat the tongue into the groove, check that the plank is level, then nail the plank in place. Continue this way until you reach the top of the wall, trimming boards as needed to accommodate any obstructions.
- At the top of the wall, you may need to rip a plank to height to complete the installation.
Wall Installation Tips
- Choose/cut plank lengths so that the butt joints are randomly staggered.
- Ensure each row is level/straight before nailing in place.
- You may need to gently tap boards together to get the tongue and groove to seat properly. If using a mallet to seat the plank, use a piece of scrap material as a buffer to help protect the edge.
- Leave a small gap at the top or bottom of the installation to account for seasonal expansion.
- Placing seams at studs or along furring strips will help minimize seasonal movement.
- Blind nail at a 45-degree angle so the brad does not interfere with placement of the next board.
- If a brad does not set correctly, use a hammer and nail punch to set it manually.
Ceiling Installation Instructions
- Remove/account for any obstructions – including crown moulding, light fixtures and HVAC vents.
- Mark the studs/joists, if they are not visible.
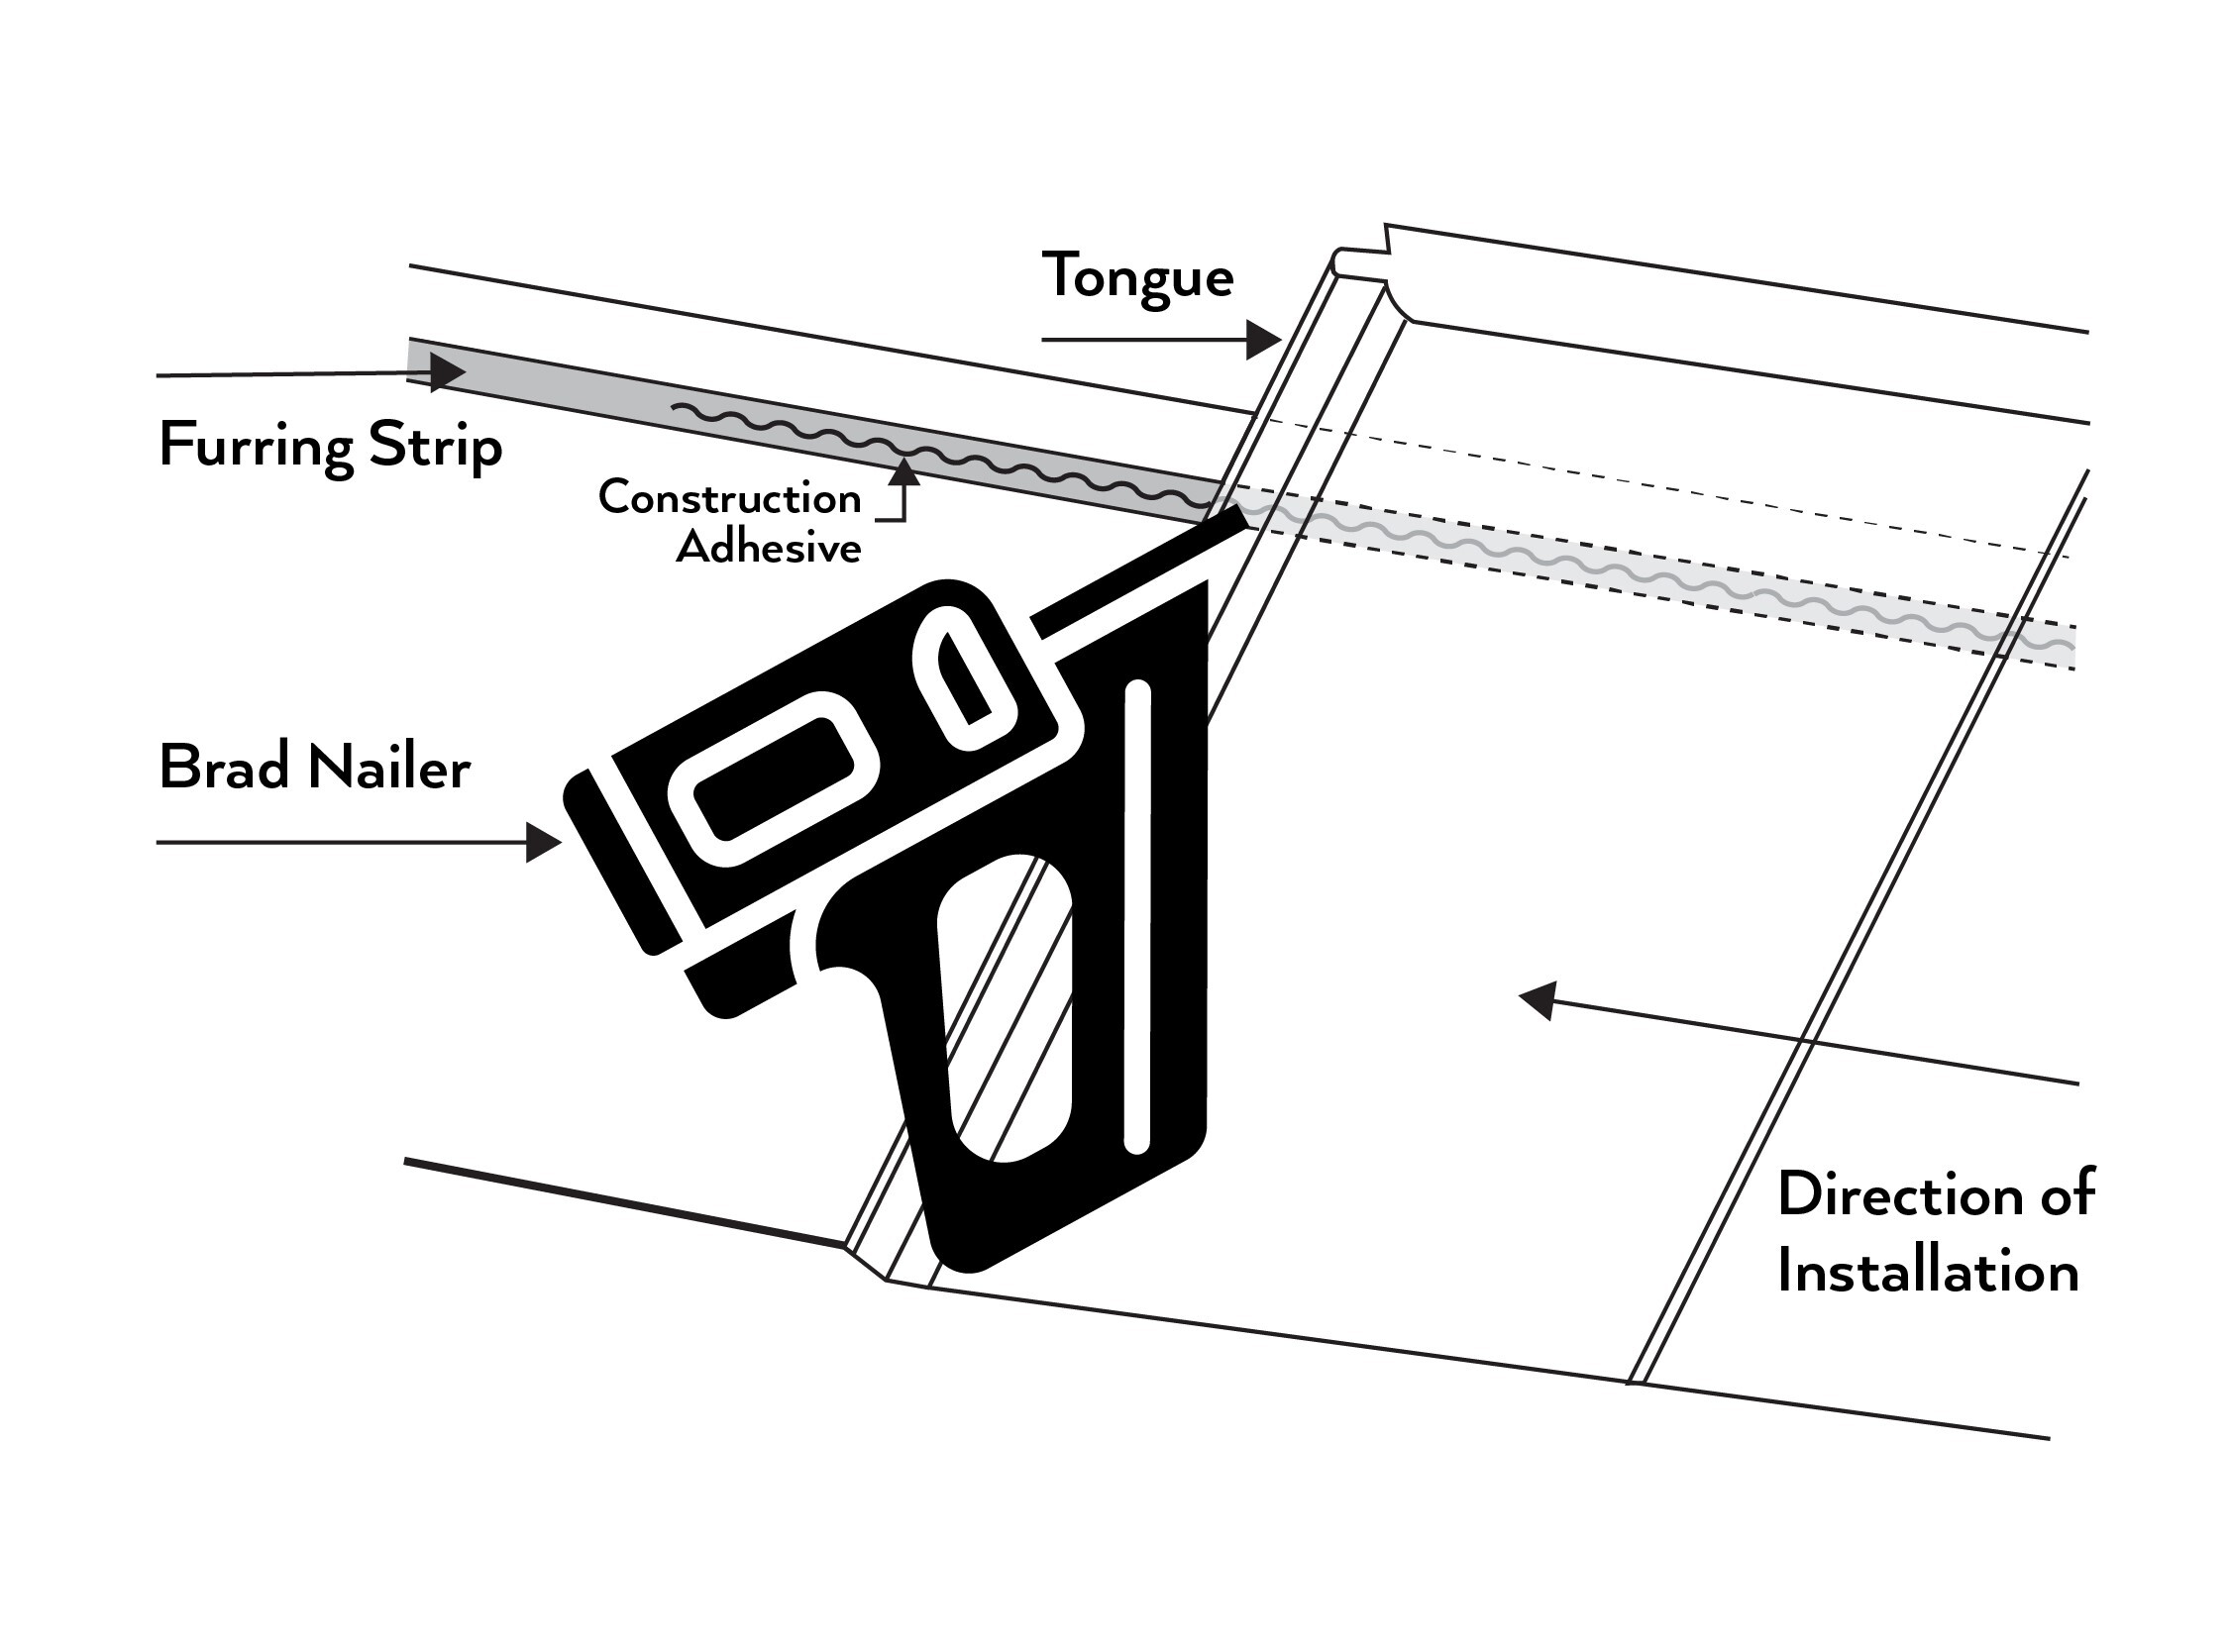
- It is a good idea to install 1-inch X 2-inch furring strips perpendicular to the intended direction of the tongue and groove planks. Fasten the furring strips directly to the framing with 2-1/2-inch screws. Furring strips enable you to run the ceiling in your chosen direction, allowing you to verify that the brads are hitting a stable surface.
- Add a small bead of adhesive to the furring strip.
- Place the first plank where the ceiling meets the wall with the groove edge against the wall (tongue edge facing out).
- Use a carpenter square/level/laser to ensure the plank is straight.
- For the first plank, drive brads into the furring strips along the groove/wall edge of the plank.
- Blind-nail the tongue edges of the plank by driving brads through the shoulder of the tongue and into furring strips at a 45-degree angle. Do not put brads straight into the tongue as they will obstruct the next plank.
- Continue the length of the first row of planks by butting the planks together.
- Start the next row by adding a bead of adhesive, securely seating the tongue into the groove, checking that the plank is straight, then nailing the plank in place. Continue this way until you reach the other side of the room. Trim boards as needed to accommodate light fixtures, vents and other obstructions.
- At the end of the ceiling, you may need to rip a plank to complete the installation.
Ceiling Installation Tips
- Choose/cut plank lengths so that the butt joints are randomly staggered.
- Ensure each row is level/straight before nailing in place.
- You may need to gently tap boards together to get the tongue and groove to seat properly. If using a mallet to seat the plank, use a piece of scrap material as a buffer to help protect the edge.
- Leave a small gap at the top or bottom of the installation to account for seasonal expansion
- Placing seams at studs or along furring strips will help minimize seasonal movement.
- Blind nail at a 45-degree angle so the brad does not interfere with placement of the next board.
- If a brad does not set correctly, use a hammer and nail punch to set it manually.