
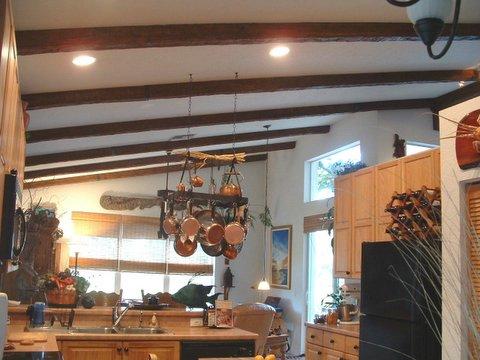
Leah, from Pennsylvania, wrote to us with a question about how to space our beams for her kitchen remodeling project:
“My husband and I have decided that your faux wood beams are just the thing to suit the sloping ceiling in our new kitchen – but we have a question. Our kitchen is about 20’ long. How many beams should we install? And how far apart should they be?”
This is actually a common question – and there’s no right or wrong answer. That being said, we’ve got some information that might help.
Spacing Exposed Beams in Kitchens
Our beams are molded in tough and durable polyurethane to look exactly like the real thing; so obviously we recommend installing them in a manner consistent with how “real” exposed beams would appear on your roof or ceiling.
Traditionally, wooden beams were structural – so the distance between beams was more about how much support a ceiling needed, rather than what looked best.
If you’re considering installing faux beams, you should consider that when deciding how far apart you want to space them. Check out our spacing guide here.
The beams are also available in a range of thicknesses, so keep that in mind during your planning.
In real construction, thicker beams obviously give more structural support – so you’d need fewer of them. That should be mirrored depending on the size of the beams you’ve ordered.
As a good rule of thumb, our most popular beams are sold in thicknesses of between 4” and 6”. With structural beams, you’d probably space them about four feet apart if they were of that thickness. Therefore a convincing look can be achieved by spacing your faux beams the same.
Thinner beams, like our 2½” beams, are created to mirror the interior ceiling beams used between the stories of older houses. These would generally be placed no more than two feet apart from each other, to give adequate support to the floorboards.
Finally, our thickest beams are the same size as solid wood beams that could theoretically support almost the entire weight of an older home. For a look that stays true to the way ceiling beams were traditionally used, you can separate our largest beams by as much as eight feet.
Remember, though, that you have a major advantage traditional builders didn’t: You’re not a slave to physics or architecture. If you feel what sounds right “on paper” won’t look good when they’re installed on your ceiling, you should adjust your installation to suit.
Ultimately, this is what Leah did when we gave her some advice on installation.
“My husband and I measured out the entire ceiling and marked the dead center line between one end of the room and the other. This was where we installed our first beam.”
“From there, we measured out the remaining space on either side of this central beam and considered what would look best. We were installing your 6” x 4” Chamfered Beams and were aiming to separate them by at least four feet.
In the end, through, we realized that would look kind of goofy and asymmetrical; with the second row of beams closer to the wall than they were to the central beam.”
“So instead, we split the difference and added second and third beams midway between the wall and the central beam – a distance of 5” either side. It looked great and once they’d been installed, they looked just like they were authentic supporting timber beams.”
Our beams have many advantages, but perhaps the biggest is the freedom to install them how you want, according to your taste and design ideas. It’s one way in which faux wood doesn’t just look like the “real thing” – sometimes you can make it look even better.
If you have any suggestions or tips on how far apart to space your beams, let us know. Send an email and pictures to info@fauxwoodbeams.com.
Shop Related Products


