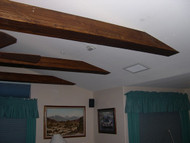
When one of our customers, Dan, decided to transform his sloped ceiling with a row of faux beams, he approached the project with a laser-like attention to detail.
One he’d probably developed spending 35 years as a Mechanical Engineer with the Northrop Grumman Aircraft Company.
This explains why, in addition to the photos of his remodeled ceiling, Dan also sent us a detailed step-by-step guide to following his installation, “plus a few suggestions that would be helpful for anybody else attempting to ‘do-it-yourself.’”
The Sloped Ceiling Challenge of Making Beams Flush
Dan's challenge was matching the angle of his sloped ceiling so that the beams sat flush.
“The real challenge of my planned installation,” Dan writes, “was getting a close interface fit between the ends of the beams and my sloped ceiling.” This was where his decades of engineering expertise came in useful.
Dan chose to use six Sandblasted Beams. In addition to perfectly mimicking real wood's texture, they only weight 16lbs each; “Which made the task of securing each beam very easy.”
It wasn’t just the weight that made choosing faux such a smart idea. Dan was also able to cut his beams much more accurately and easily than a full-weight, solid wood beam.
After taking painstakingly accurate measurements – evidence, once again, of his years as an engineer, Dan writes: “I used a fine pitch hand saw to make the cuts. I simply placed masking tape on the beam and used a marking pen to transfer the cut angle. “
“The sawing process was far easier that I thought possible,” Dan admits. “It went very easy because of the high density foam the beams are made out of, and left a straight smooth finish that matched perfectly with the ceiling.”
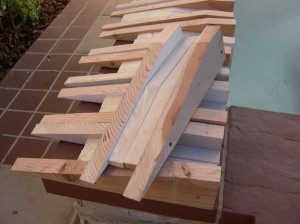
Engineering experience gave him the idea of creating wooden mounting blocks. Problem solved!
“From there, the only real challenge was attaching the angled mounting surface to the sloped ceiling,” Dan explains. “That was accomplished by fabricating a mounting block that simulated the finished beam and matched the slope of the ceiling.”
“The mounting blocks were constructed from a length of 2”X4” just over a foot long, with four attached quarter-inch pieces of wood shaped to the slope of the ceiling.”
After installing one on each side of the ceiling “you just slide the beam over the blocks and secure them each end with two flat head screws. The beams are so light that only two quarter-inch bolts are required to attach each mounting block to the ceiling. The screws easily countersink themselves into the foam beam and you just fill the depressions with a color-coordinated filler.”
“You’re finished,” Dan wraps up. “Now just wait for the compliments to start pouring in!”
And by the look of Dan’s completed ceiling, those compliments would be well deserved – but something else makes his installation all the more impressive.
“I’m 78,” Dan writes casually, “and my wife – I forget her age – was my assistant.”
That just goes to show that faux beams are manageable for just about anybody to install – even if you don’t possess Dan’s decades of engineering experience.
Shop Related Products


