
Stacked Stone Style for Shiplap Fireplace Wall
This fireplace project combined a shiplap wall with our Regency Stacked Stone panels for an strikingly beautiful look.
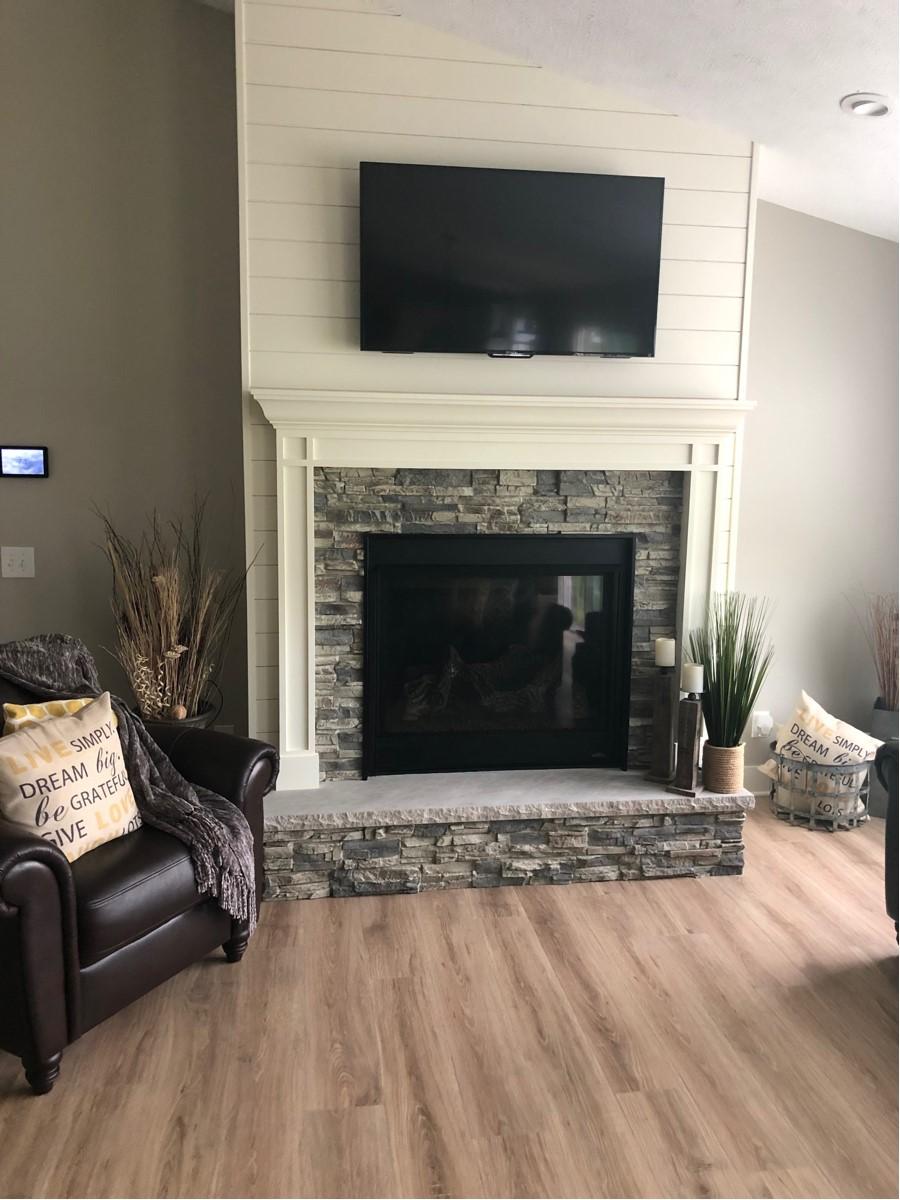
This project was sent in by BarronDesigns.com customer, Chad, who wanted to create a new fireplace for his home, and wanted the grounded elegance of stone to be part of it.
However, Chad's home is designed in a contemporary style, so using our wall paneling to create something rustic wouldn't have blended well. Therefore, Chad decided to make faux stone an accent of the fireplace, rather than the focus.
The project began by constructing a frame for the chimney, using standard framing methods. This was boxed in with a shiplap-style exterior, with a subtle indent cut out for the accent. A framed hearth with a real stone top was also built at the base of the fireplace.
A pre-assembled mantle and surround framed the accent cutout, and this is where our faux stone panels went.

Chad ordered our Regency Stacked Stone panels in Birchwood color, and attached these directly to the wooden surface of the chimney surround. As you can see from the illustration, he started installation in the bottom left-hand corner, securing the panels with construction adhesive and screws.
Next, Chad cut out the shape of the recessed fireplace with a regular wood saw, continuing the stone texture on the other side. Because our panels are manufactured from a durable polyurethane foam, they're incredibly easy to cut with tools most homeowners also own.
Chad also covered the wooden 'hearth' of the fire with the wall paneling, and here you can see how perfectly the Birchwood color matches the real stone on top of the hearth. You can also see how nicely Chad mitered the corners of the hearth - creating a seamless stonework pattern that flowed across all three sides. The seams between the panels and the corners are already pretty perfect, but Chad spent a little time caulking to make it nearly impossible to tell where one panel ends and the next begins.

In contrast to the scale of the fireplace, our faux stone panels make up a very small portion - but you can see how impressive the stone accent is; and now beautifully the fireplace matches the rest of the decor.
In the email that accompanied these pictures, Chad wrote:
"Thanks BarronDesigns.com! The product arrived earlier than expected and I couldn’t be more excited about how your panels looked after being installed - and installation was very easy! The whole project, from start to finish, didn’t take more than a couple of hours. Caulk and grout hid all the seams so nicely – you can't tell where the panels joined together!"
We think Chad did an amazing job, and are really excited to be able to share pictures of all his hard work here. What do you think? Let us know in the comments section below.


