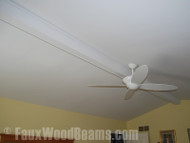
Frank Macari wrote to us with the story of how a faux beam helped solve a recurring problem he and his wife had with the cathedral ceiling of their beautiful Pennsylvania home.
“My wife and I purchased our home 21 years ago,” Frank wrote. “The bedroom had a cathedral ceiling and when the home was new, the seam looked good. However, as time has aged the house, the seam became increasingly difficult to keep intact.”
It has been repaired many times and due to the slight shifting of the ceiling, due to heat and cold, the crack would always come back over time.”
Due to the steaming summers and brutal winters common in Pennsylvania, Frank noticed a reoccurring crack opening up in the apex of their ceiling. “It’s been repaired many times, but due to the shifting ceiling always comes back over time.”
His solution was a simple one – covering the crack with a beam – but the practicalities of this great home improvement idea were daunting.
“My wife and I talked about a beam, but because of the weight and amount of work involved, I kept putting it off.”
Eventually, Frank’s wife came up with a solution: going ‘faux’.
“She said that maybe we could buy a beam on line and keep it simple. Taking her advice, I looked on line and found fauxwoodbeams.com.”
The first challenge Frank encountered was the length of his cathedral ceiling: “Our room was longer than the biggest beam by about 8 inches.”
Fortunately, he had a brilliant idea about how to solve this problem – and we were happy to help.
“I requested a sample of the beam we were considering,” Frank wrote. “The typical length of sample was around 6 inches. I requested a sample about 9 inches and Fauxwoodbeams.com was very accommodating.”
After checking that they were happy with the sample, Frank went ahead and ordered the full-sized beam – one of our Regal Ceiling Beams. “Sure, the shipping was expensive, but worth it. It came in one long piece and undamaged.”
Now, with the 9 inch sample and the beam itself, he had the beginnings of a beam long enough to cover his cathedral ceiling. “I glued the two pieces together and let it cure. Afterwards, I used an automotive “Bondo” material and filled in the part lines. I sanded and primed, and repeated as necessary.”
Installation was straightforward – for the most part.
“The trick was how to get the beam into the bedroom in the first place, located on the second floor. In the end, we managed to bring it in through the bathroom window.”
“My wife, son and I positioned the beam close to the ceiling and I secured it with glue that I purchased from fauxwoodbeams.com and a power nailer.”
Once installed, the finishing touches were straightforward. “All that remained to be done was to fill the nail holes, caulk the edges and have the room painted. Now it was up, installed and looked beautiful.”
“My wife could not have been happier. “Mission accomplished” and now there are no more cracks in the cathedral ceiling joint.”
Shop Related Products


