Installation Instructions For Flush Mounted Box Beams
General Tools and Materials:
-
 Wood Beam(s)
-
 Wood Blocking 2"x4" or 2"x6" (for mounting)
-
 Toggle/Lag Bolts
(Only required
for certain
installation
scenarios.)
Toggle/Lag Bolts
(Only required
for certain
installation
scenarios.)
-
 Screw Gun / Drill Driver & Bits
-
 Wood Cutting Saw with Finish Blade
-
 Caulk Gun
-
 Loctite® PL® Premium® 3X Construction Adhesive
-
 Color Complimenting Textured Caulk
-
 Hand Saw with Finish Blade
-
 Deck Screws
-
 Chalk Line / Laser
-
 Pencil
-
 Safety Glasses
-
 Square/Triangle
-
 Stud Finder
-
 Tack Cloth
-
 Tape Measure
-
 (2) Ladders
-
 Touchup Kit
-
 Clean Cloth
-
 Small Paint Brush
-
 Painters Tape
24 Hours Before Starting
Acclimate all beams by storing them flat in the installation location (but away from moisture and direct sunlight or other heat sources) for at least 24 hours.
Acclimate all beams by storing them flat in the installation location (but away from moisture and direct sunlight or other heat sources) for at least 24 hours.
Installation Overview
WARNINGS:
- Be sure to obey all safety rules and recommendations set forth by tool manufacturers.
- Wear safety glasses during the entire installation process.
- Always comply with clearances set forth by the manufacturer of stoves, fireplaces, furnaces, and any other heat source.
WARNING: Our products may have screws embedded below the surface. We recommend using a hand saw (not power tools) when cutting these products. You may locate screws with a stud finder. Barron Designs is not responsible for any bodily harm or damage to your equipment.
WARNING: Beams are for decorative purposes only. They are not to be used for structural support, bracing or suspension of objects.
WARNING: Beams are for decorative purposes only. They are not to be used for structural support, bracing or suspension of objects.
Before You Start
- Ensure surface is structurally sound and in good condition. Surfaces such as drywall should be flat and smooth to minimize gaps.
- Gather all tools and materials.
- Inspect Beams:
- If the beam(s) shipped in more than once piece, there will be markings inside the beams that indicate intended fit.
- If the beam(s) have a lap or scarf joint, be sure to mount the top section first.

Beams Installation
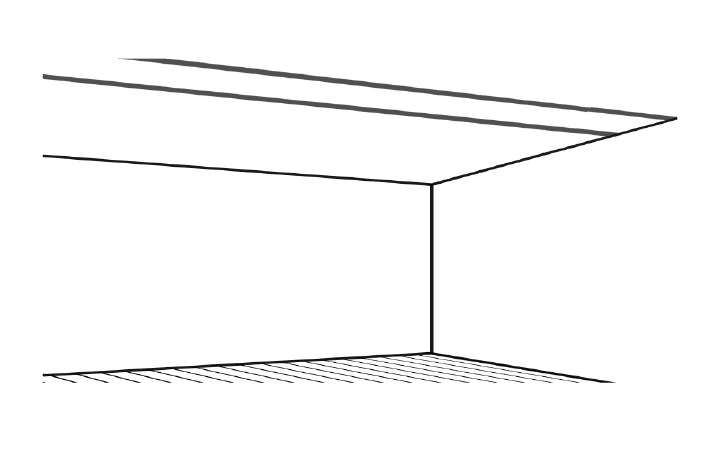
Step 1
Lay Out the Installation
Tools:
- Painters Tape
- Chalk Line/Laser
- Tape Measure
Establish where to install the beam and mark guidelines using painters tape or a chalk line.

Step 2
Locate and Mark Studs
Tools:
- Pencil
- Stud Finder
- Mark all studs using a stud finder and pencil.
- If studs do not align with the installation, plan to use toggle/lag bolts in Step 5 to attach mounting blocks.
Step 3
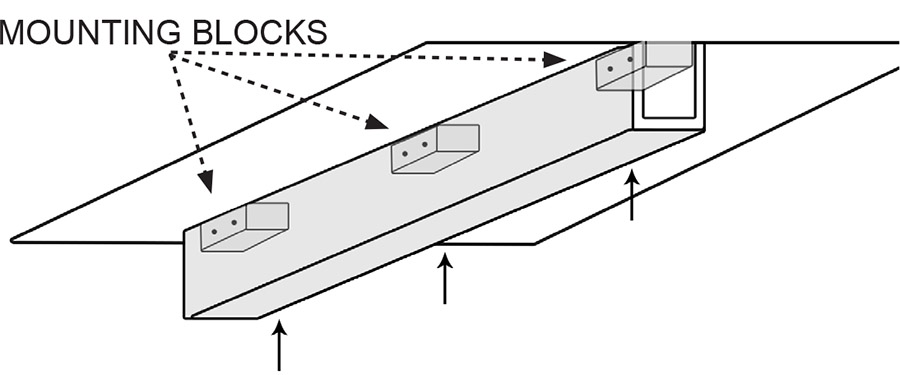
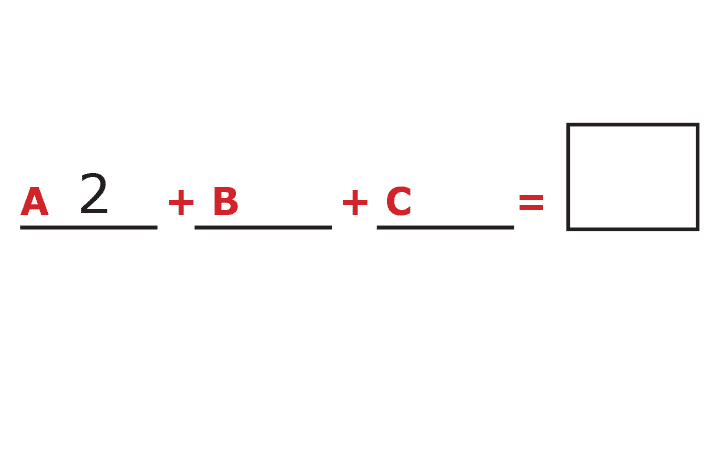
Determine Number of Mounting Blocks
Tools:
- Tape Measure
- A block at each end of the beam A
- At least every three feet along the beam. B
- If using more than (1) beam in a run, 2 mounting blocks must be used at the joint where the beams meet. C
Step 4
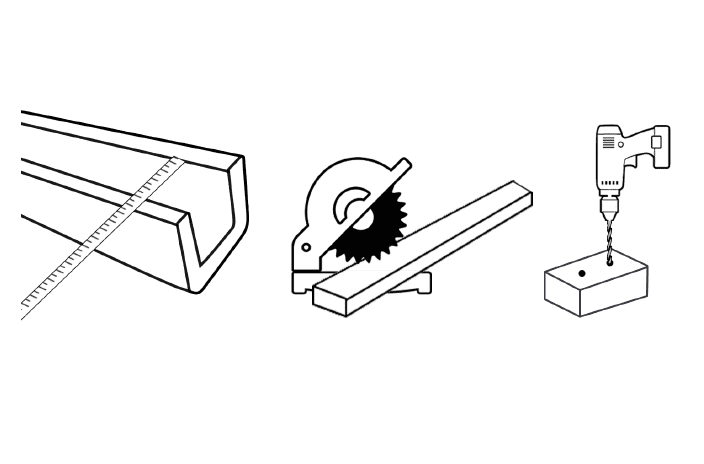
Measure and Cut Mounting Blocks
Tools:
- Square/Triangle
- Lumber
- Wood Cutting Saw
- Drill Driver & Bits
- Tape Measure
- Measure the inside dimensions of the beam and subtract 1/8 inch to determine the size of the mounting blocks.
- Cut the quantity of mounting blocks calculated in Step 3 and ensure both ends are perfectly square.
- Pre-drill a least (2) holes per block to make them easier to attach.
Step 5
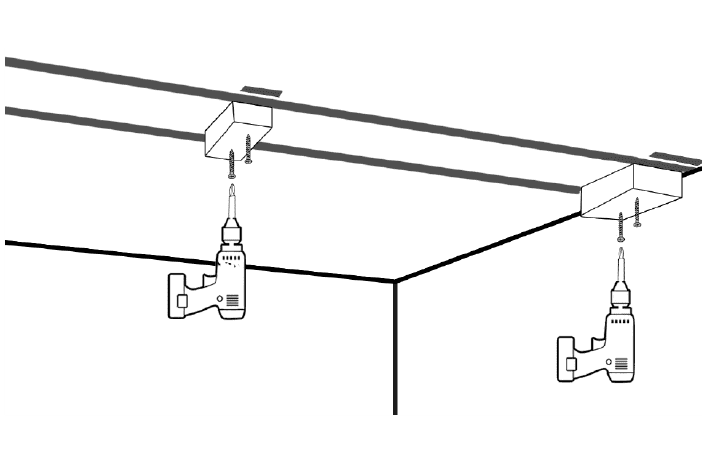
Attach Mounting Blocks to Ceiling
Tools:
- Drill Driver & Bits
- Toggle/Lag Bolts
- Painters Tape
- Screws
- Mounting Block
- Attach the first mounting block as close to the side wall as possible and in line with the guides from Step 1. The blocks on either end of the installation serve to minimize future gapping due to seasonal expansion and contraction.
- Secure additional mounting blocks every 2 1/2 to 3 feet screws or lag bolts, or into drywall using toggle bolts. If joining more than (1) beam, ensure that there are at least 2 mounting blocks at the point where the beams will meet and that the blocks project 2 to 3 inches on both sides of the joint.
- Remove painters tape guide lines (if used).
- Mark the location of the mounting blocks by placing painters tape on the ceiling about 1 1/2 inches from each side of the blocks. This is a reference point for Step 8.

Step 6
Dry Fit
Tools:
- Hand Saw with Finish Blade
- Check beam length by dry fitting in place.
- Tim/Miter beam if needed. It is best to cut the beam slightly long (by about 1/8") to ensure a tight fit.
WARNING: Our products may have screws embedded below the surface. We recommend using a hand saw (not power tools) when cutting these products. You may find these screws with a stud finder. Barron Designs is not responsible for any bodily harm or damage to your equipment.

Step 7
Apply Adhesive
Tools:
- Adhesive
- Caulk Gun
- Tack Cloth
- Wipe the edges of the mounting blocks and the inside of the beam with a tack cloth to remove debris.
- Apply adhesive to the edges of the mounting blocks that will contact the beam.

Step 8
Install Beam
Tools:
- Clean Cloth
- Screw Gun / Drill Driver & Bits
- Screws
- Slide beam in place over the mounting blocks.
- Slightly countersink a minimum of (4) screws, ((2) per side), through the beam at each mounting block. If your beam has more than one section, be sure to secure each section with at least 4 screws (2 per side), penetrating each mounting block that straddles the sections.
- Remove painters tape.

Step 9
Touch-Up
Tools:
- Caulk
- Caulk Gun
- Touch-Up Kit
- Small Paint Brush
- Apply color complimenting textured caulk to fill screw holes. Blend caulk into adjacent surfaces while it is still wet.
- Where necessary, apply caulk to joints and gaps.
- Use paint from the touch-up kit to paint over the caulk.